Unity Basics Tutorial
Learn the fundamentals of game development with Unity
Introduction to Unity
Unity is a powerful and versatile game engine that allows developers to create 2D and 3D games for various platforms. This tutorial will guide you through the basics of Unity, helping you get started on your game development journey.
Unity Interface Overview

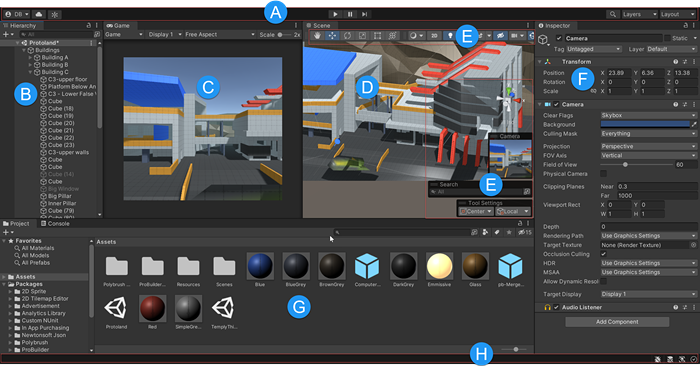
The Unity interface consists of several key windows:
- (A) Toolbar: Provides access to your Unity Account and Unity Cloud Services. It also contains controls for Play mode; Undo history; Unity Search; a layer visibility menu; and the Editor layout menu.
- (B) Hierarchy Window: A hierarchical text representation of every GameObject in the Scene. Each item in the Scene has an entry in the hierarchy, so the two windows are inherently linked. The hierarchy reveals the structure of how GameObjects attach to each other.
- (C) Game View: Simulates what your final rendered game will look like through your Scene Cameras. When you click the Play button, the simulation begins.
- (D) Scene View: Allows you to visually navigate and edit your Scene. The Scene view can display a 3D or 2D perspective, depending on the type of Project you are working on.
- (E) Overlays: Contain the basic tools for manipulating the Scene view and the GameObjects within it. You can also add custom Overlays to improve your workflow.
- (F) Inspector Window: Allows you to view and edit all the properties of the currently selected GameObject. Because different types of GameObjects have different sets of properties, the layout and contents of the Inspector window change each time you select a different GameObject.
- (G) Project Window: Displays your library of Assets that are available to use in your Project. When you import Assets into your Project, they appear here.
- (H) Status Bar: Provides notifications about various Unity processes, and quick access to related tools and settings.
Creating Your First Scene
- Open Unity and create a new 3D project.
- In the Hierarchy window, right-click and select 3D Object > Cube to add a cube to your scene.
- Use the Transform component in the Inspector to position, rotate, and scale the cube.
- Add a Main Camera to your scene if it's not already present.
- Position the camera to view your cube.
- Press the Play button to enter Play Mode and see your scene in action.
GameObjects and Components
In Unity, everything in your game is a GameObject. GameObjects are containers that hold Components, which define their behavior and properties.
Common Components:
- Transform: Defines position, rotation, and scale (every GameObject has this).
- Mesh Renderer: Renders a 3D mesh in the game.
- Collider: Defines the shape used for physical collisions.
- Rigidbody: Allows a GameObject to be affected by physics.
- Camera: Defines a viewpoint from which the game is rendered.
- Light: Adds illumination to your scene.
Basic Scripting in C#
Unity uses C# for scripting. Here's a basic script to make an object rotate:
using UnityEngine;

public class Rotator : MonoBehaviour
{
    public float rotationSpeed = 50f;

    void Update()
    {
        transform.Rotate(Vector3.up, rotationSpeed * Time.deltaTime);
    }
}
To use this script:
- Create a new C# script in your Project window and name it "Rotator".
- Double-click the script to open it in your code editor.
- Replace the default code with the code above.
- Save the script and return to Unity.
- Drag the script onto a GameObject in your scene.
- Press Play to see the object rotate.
Building and Running Your Game
Once you've created your game, you can build and run it:
- Go to File > Build Settings.
- Choose your target platform (e.g., Windows, Mac, WebGL).
- Click "Add Open Scenes" to add your current scene to the build.
- Click "Build" to create an executable file.
- Choose a location to save your build.
- Once the build is complete, you can run your game outside of Unity!
Video Tutorial
Next Steps
Now that you've learned the basics of Unity, you're ready to start creating more complex games. Consider exploring these topics next:
- Input handling and player controls
- Unity's physics system
- Animation in Unity
- UI creation with Unity's Canvas system
- Audio implementation in Unity